E2E Testing Cluster on AWS Fargate – Part 1
Project Sources:
We bundled everything needed to set up the AWS Fargate Cluster in a project, available at https://github.com/cosee/selenium-grid-aws-fargate
For testing purposes we implemented a Pytest Project which includes (demo) test cases. This is also hosted at https://github.com/cosee/realworld-demo-ui-test.
And finally the Frontend we use for testing purposes is a fork of a realworld example project.
The base for our selenium-grid-aws-fargate was https://github.com/xilution/xilution-selenium-grid. We modified it quite heavily to work as we wanted. You can look there if you just want to spinup a selenium-grid in a Fargate stack without the extras we needed.
The Story Behind The Project
About 2 years ago we decided that it was finally time to work on our UI Tests. Prior to that we didn’t really test our UI – besides manually checking if a specific thing is working. We didn’t have reliable testing mechanisms. In most cases bugs would have been easily covered by tests. We are not talking about the usual „keep your code in check“-tests. These make a lot of sense for the developer and the final product.
Most of the time we just needed to know: Are all systems from the Log-In Form to the ordering process functioning? Honestly, we had no way to tell if something is broken without letting users have a frustrating experience. This made it even more clear how important another feedback loop is. To the end that live systems need to be checked and tested. However there are some limitations:
- E2E tests take time. More than Unit or Integration tests. So one consequence is that they must not block our pipeline
- Tests will litter up our dev systems
- They will stress out the infrastructure (which is a valid assertion too)
- There will be many false positives. E.g. 503 by excessive access, timeouts in the cluster or any other cause not related to the tests. This is still our main source for failed tests.
We knew that some of these limitations would be a problem but we didn’t know to which extent. The first problem (a slow run time) initiated this AWS Fargate project. At some point we had over 500 UI Tests which resulted in a 2h waiting time before getting any feedback. To counteract this we ran a cron job early in the morning and at 3 PM, which would guarantee us at least 2 results a day and an additional time window to react.
The second problem (littered systems) was solved by using a more advanced stubbing service: Wiremock. More on that later.
The last two concerns (a stressed infrastructure and timeouts) didn’t receive the focus they deserved. Currently, we are testing against a large React application which renders and builds in the browser. Testing against a Single Page Application differs strongly from a static web page. We didn’t find many helpful resources online that addressed these problems, which is why we present our solution to this specific problem.
Essential goals
What are our main goals setting up and automating our E2E tests?
-
Improving feedback times. Being able to catch bugs detected by tests early:
- Parallel test execution on a test cluster. This means using multiple browsers to allow a better test throughput.
- A scalable cluster. We want to be able to further improve test run times if needed by using more nodes with browsers.
- Isolation: Different browser sessions should not affect the results of other concurrently running sessions.
-
Running whole test suites in parallel (this might not be a requirement for you):
- Getting feedback on every change of code. This helps identifying which code change resulted in a test failure and potentially a bug.
- Isolated results for every commit. Running two or more test suites simultaneously should not affect the results.
- Automatic startup and shutdown of the tests. We want minimal maintenance. When triggered by our pipeline the tests should automatically organize required resources to run on. Once they are finished all occupied resources should be removed. We don’t want to pay for idle resources.
Technology Stack
The most obvious choice first: Selenium. Selenium offers an API to control the browser – the WebDriver API. The organization behind this is called SeleniumHQ. Besides the API they offer different bindings to their API for a lot of languages. We used the selenium bindings for python.
But this is completely up to you. One of the big advantages with selenium is that you can choose your test runner, the language and the browser you are testing on (IE, Safari, Chrome, Firefox).
Browser Orchestration
„Selenium Grid“ is capable of managing and orchestrating your test runners with different browser sessions. You can connect multiple browser instances to one grid. It basically manages a network of browsers that can be used to execute the commands defined by your tests.
Test Runner
We chose pytest for composing and running our tests. Which means that we also have to use python. Most of the times you will find a lot of questions and answers for python or java. We evaluated both and ultimately python won. One thing beforehand: It was a valuable choice. The tests are concise, clear and self-explanatory. It seemed like a good fit for our team. Something we didn’t see at the beginning is the advantage of using pytest’s fixtures. They came very handy in managing resources like browser sessions.
Stubbing
As mentioned in the introduction to reduce the „spam“ caused by our tests we were looking for a solution to not only stub certain responses, but to also imitate some parts of the backend logic. After some research we found out that wiremock is perfectly suited for it. We can set up scenarios where we can imitate parts of the backend. Wiremock offers to define „scenarios“. Those are stubs that contain a state or rather change a state within wiremock. This state can change depending on requests that belong to a collection of scenarios (uniquely identified by a string that you choose).
Continues Deployment / Integration
We use GitLab to host our code and GitLabCI to run our pipelines. To get precise feedback on our code changes we trigger the Selenium test pipeline with two projects. Our frontend project as well as our selenium project. The configuration for the GitLab CI Job will be released in another blog post. For now we will solely focus on a local setup script.
Container Orchestration
Some of our colleagues recommended Fargate to run our UI Tests. After evaluating AWS Lambda, EC2 with auto scaling, EC2 with a beefy host, manually deploying to different EC2 instances, deploying to ECS and so on we figured that Fargate was a perfect fit for our use case. We were lucky that just when we started investigating Fargate was released on US-East. It solved many of our problems on a conceptional level. With the help of CloudFormation we setup the AWS infrastructure.
The Big Picture
Before we take on the implementation details, let’s take a step back and look how we envision the final solution:

Once a developer makes a change to the codebase, a CI/CD service should trigger our E2E testing pipeline. Which includes building separate containers using the current code with the assets (tests, frontend, stubs…) with some configurations. The containers are then pushed to AWS and a CloudFormation template sets up the AWS resources we need: Fargate, VPC, LoadBalancer and so on. After running all tests our test runner heroically sends the test results with its last breath as it kills itself with every resource acquired by the stack. But its sacrifice was not in vain as the developers gets notified of the test results via Slack.
The Smaller Picture
This blog post won’t cover the GitLab CI pipeline, as well as the slack notifier. We will be writing another post which covers those topics, probably as part 2.
The “reduced” overview:
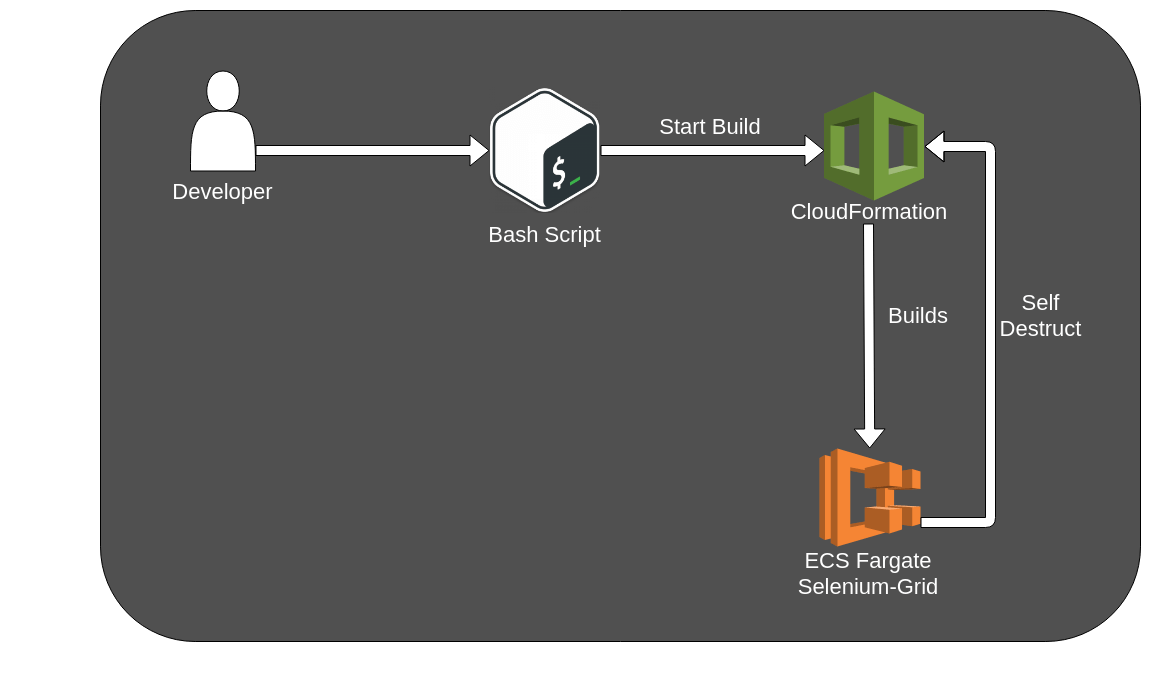
Implementation
Assets and Services
Running an E2E test with every commit means that your code needs to run in an isolated cluster where it can’t be changed. You need to „freeze“ the current state of the code with every other dependency. Some things are easier than others. For example it is not easy to include a SSO-Service in your cluster. But for the frontend or the test runner it is easy.

Every Container in AWS Fargate pulls its own image that was built beforehand and pushed to ECR (a container repository). For the frontend we use a Caddy base image and inject our (compiled) code base. The test runner is a pytest base image, with our whole test project injected. Its entry page basically starts the tests like we would on our own machines. But to be sure that every cluster pulls it designated containers, we tag them with the current time. In the CloudFormation template we define the tag as a variable to let Fargate know which images to pull from ECR.

CloudFormation Script
You can find the complete CloudFormation script in our GitHub project. It sets up our whole Fargate cluster, a load balancer for internal communication between Fargate nodes and the required IAM roles. First let’s walk you through some of the structure you should know to be able to modify it for your needs. It starts with a fairly big parameter list. Note that most of these you can specify in the setup script we will talk about later:
- ContainerCpu, ContainerMemory: This specifies the size of our wiremock, UI and selenium hub and nodes. The default is 512 (half a core) for CPU and 1024 (1GB) for memory. We found the size is not as important for these parts so we go as low as possible. Note that only our server running pytest uses bigger hardware. But you can specify other values if you need to.
- ClusterName: Choose any name you want to be able to identify it on CloudFormation and Fargate. This should be a unique value to prevent conflicts. In our script we use the current time value to make it unique.
- VPC, PrivateSubnetOne, PrivateSubnetTwo: Provide your VPC and subnet addresses. We intentionally do not create new VPC’s as the region limit is 5 and we can isolate our clusters using other mechanics.
- UiGitHash, SeleniumGitHash, SeleniumGitNumber: These are just for identifying test results. For now you can ignore them; they get more relevant once we move to part 2.
- S3ResultsBucket: This parameter will also be relevant in part 2. The idea is that the results generated by pytest are uploaded to a S3 bucket which you will have to create beforehand. This parameter defines the name of the bucket.
- ECRUrl: The address to the ECR on your account. E.g.
.dkr.ecr. .amazonaws.com = 123456789.dkr.ecr.eu-west-1.amazonaws.com - ECRTag: The tag with which you uploaded your ECR images. In setup skript this is the current time.
The next interesting part is the Fargate task and service definition. Let’s look at how they are built:
  TaskDefinitionWiremock:
    Type: AWS::ECS::TaskDefinition
    Properties:
      Cpu: !Ref 'ContainerCpu'
      Memory: !Ref 'ContainerMemory'
      NetworkMode: awsvpc
      RequiresCompatibilities:
        - FARGATE
      ExecutionRoleArn: !GetAtt 'ECSTaskExecutionRole.Arn'
      ContainerDefinitions:
        - Name: 'wiremock'
          Cpu: !Ref 'ContainerCpu'
          Memory: !Ref 'ContainerMemory'
          Image: !Join ['', [!Ref 'ECRUrl', '/wiremock:', !Ref 'ECRTag']]
          LogConfiguration:
            LogDriver: awslogs
            Options:
              awslogs-group: !Ref LogGroup
              awslogs-region: !Ref 'AWS::Region'
              awslogs-stream-prefix: 'selenium'
          PortMappings:
            - ContainerPort: 8080
Every Fargate node needs to have a task definition telling it which ECR image to use and which ports should be accessible. We specify the image by joining the ECR URL with the image name and it’s unique tag we have given it earlier when we built and pushed the docker image to ECR. You notice that CPU and Memory are defined twice. One definition is for the node itself and the other one is for the docker image we run on the node. This implies that you can have multiple images running on the same node but we do not need this here.
  ServiceWiremock:
    Type: AWS::ECS::Service
    DependsOn: [ServiceHub, LoadBalancerRule8080]
    Properties:
      ServiceName: 'wiremock'
      Cluster: !Ref 'ECSCluster'
      LaunchType: FARGATE
      DeploymentConfiguration:
        MaximumPercent: 200
        MinimumHealthyPercent: 75
      DesiredCount: 1
      NetworkConfiguration:
        AwsvpcConfiguration:
          AssignPublicIp: ENABLED
          SecurityGroups:
            - !Ref 'FargateContainerSecurityGroup'
          Subnets:
            - !Ref 'PrivateSubnetOne'
            - !Ref 'PrivateSubnetTwo'
      TaskDefinition: !Ref 'TaskDefinitionWiremock'
      LoadBalancers:
        - ContainerName: 'wiremock'
          ContainerPort: 8080
          TargetGroupArn: !Ref 'TargetGroup8080'
The service definition tells Fargate with which security group, subnet and at what scale to run our nodes on. We also tell it to use the task definition we just explained. The parameter „DesiredCount“ is the magical part of Fargate. We can set it to 10 and Fargate will try to provide 10 nodes with our image at all times. We use this for our selenium nodes but a single wiremock is enough in this code snippet. With the last part we tell our node to register at a target group. We will not go into detail here but it allows our nodes to communicate with one another via a load balancer.
Delete CloudFormation stack
We could write a lot about this topic as it took a lot of time to get it right. For now we will focus on the essential parts. The main problem is that we can’t just tell our last node to delete the CloudFormation stack without sufficient rights to remove all resources. You could do this by giving it admin rights, but this is a major security risk. So we need to create an IAM role which has the rights to remove all acquired resources of the stack. Note you don’t need to understand all of this in detail.
ECSPytestTaskRole:
Type: AWS::IAM::Role
Properties:
  AssumeRolePolicyDocument:
    Statement:
      - Effect: Allow
        Principal:
          Service: [ecs-tasks.amazonaws.com]
        Action: ['sts:AssumeRole']
  Path: /
  Policies:
    - PolicyName: ECSStackDeletionRole
      PolicyDocument:
        Statement:
          - Effect: Allow
            Action: 'cloudformation:DeleteStack'
            Resource: !Join ['', ['arn:aws:cloudformation:', !Ref 'AWS::Region', ':', !Ref 'AWS::AccountId', ':stack/', !Ref 'ClusterName', '/*']]

          - Effect: Allow
            Action:
              - 'ec2:DeleteSecurityGroup'
              - 'ec2:RevokeSecurityGroupIngress'
            Resource: '*'
            Condition:
              StringEquals:
                'elasticloadbalancing:ResourceTag/aws:cloudformation:stack-id': !Ref 'AWS::StackId'
...
The point is that we restricted the access of every role as finely grained as possible. You can see we are joining together several parts to reference a specific resource in our stack. You may be wondering why we wouldn’t just use the „!Ref“ function of CloudFormation to get the identifier of resources. This was actually the first thing we tried. But there is a big issue to consider:
Resource Dependency: If we use the „!Ref“ functions the referenced resource needs to exist first. This implies a certain order of execution of creation where our IAM role gets created at the end. When deleting the stack the order is applied in reverse which places the IAM role first. Which means the role gets deleted first. And once the role itself gets deleted nothing further can be deleted. That results in a rollback failure for the CloudFormation stack and resources cluttering our system.
To fix this we reference the resources of the role by manually building their identifiers as you can see in the code snippet. This is quite cumbersome; however there is some help online. If you ever need to do this yourself you can visit Cloudonaut and look up how fine granular you can get the resource level.
But it doesn’t end here. It is still possible that our IAM role gets deleted before the last resource of our stack is reached. This is why you will often see something like this:
  ECSCluster:
    DependsOn: ECSPytestTaskRole
It enforces a certain order of creation where the IAM role responsible for deleting the CloudFormation stack. We put the role as the root of all other resources so it is therefore created first and thus deleted last.
Trigger everything: Setup script
We don’t want to go into much detail here. The setup script „start.sh“ (located in selenium-grid-aws-fargate/src) triggers the building and uploading of the docker images as well as the start of the CloudFormation stack.
There is however some manual work to do. You will find some bash variables at the start of the script, which you have to define.
ECR_URL: open up the aws console and look for ecr repository url in the ecs dashboardVPC, PRIVATE_SUBNET_ONE, PRIVATE_SUBNET_TWO: define your vpc and subnets
REGION: define your region where the fargate cluster gets provisioned (default is eu-central-1)
FRONTEND_DIR: location of the frontend project (note that the name also depends on the folder name, defined by the git pull command in line 32)
SELENIUM_DIR: location of the test runner project (note that the name also depends on the folder name, defined by the git pull command in line 28)
If you want to change the frontend and/or test runner project, you’ll have to modify line 29 and/or line 33 with another git project. Alternatively you could modify the code to use a local project. Just be aware that you would need to replace the „ui“ and „ui-selenium“ directory values too. Once you are done you can simply invoke the script like so:
bash start.shExample Project
Front-End
To showcase the Selenium Fargate stack we used the „Realworld“ react app to test against (React Redux Realworld Example App). It’s a demo application which implements functionalities similiar to „Medium.com“. We added a Caddyfile which essentially serves the frontend and proxy any request beginning with /api to the backend.
Caddy supports the use of environmental variables, which we use to define the backend host.
Caddyfile with proxy:
proxy /api {$BACKEND_URL} {
    without /api
    transparent
}
If we take a closer look to the cloudformation.yml, where our UI Task gets defined, we see that we define a BACKEND_URL environment variable:
# Only relevant part visible:
TaskDefinitionUi:
Type: AWS::ECS::TaskDefinition
Properties:
  ContainerDefinitions:
      Environment:
        - Name: 'BACKEND_URL'
          Value: !Join ['', ['http://', !GetAtt 'InternalLoadBalancer.DNSName', ':8080']]
Back-End
We used a wiremock to substitute the backend. If you would test other components which require calls not configured in wiremock they will be redirected to the official demo backend of the react redux realworld example app. So depending on the call your test would get an error back (e.g. logging in with another user than wiremock expects). Wiremock delays every request with 500ms to slow the tests down a bit. The mocks are part of our realworld-demo-ui-test project.
The tests we wrote make sure that the article news feed shows the expected information and that the workflow of creating an article as a logged in user works. As we wanted to see the system perform at scale we used the @pytest.mark.repeat(100) annotation to replay the article newsfeed-test 100 times.
Evaluation
The selenium-grid hub is the bottleneck of the application. It runs unstable with more than 6 nodes. With that being said our tests with a single node ran in 356 s on average (3 runs being measured) compared to 82 s with 6 nodes. This looks great on paper, however it does not take into account the setup time. We need to pull the projects from Git, package docker images, upload the images to ECR, wait for the CloudFormation stack to build the ECS stack with all its services and finally start running our tests.
From triggering the bash script to starting the CloudFormation stack it took an average of 130 s. This was performed on a laptop so a bigger machine would speed up. However the overall time won’t be affected by much.
Once the CloudFormation Stack was up and running, it took an average of 363 s until pytest could run. There was no time difference when deploying more or less nodes.
This leads to an overall time of 849 s for a single node and 575 s for 6 nodes. The gap between these times will increase with the amount of tests. This means that projects with many tests and the need for isolated parallalizable tests will profit from this setup the most.
")
Useful Tools
Once in a while you may need to look at the logs of your cluster. The AWS CloudWatch log GUI is not really good for scrolling through many logs because of its limited buffer. „awslogs“ is a CLI tool which prints the logs to the terminal instead where you can easily scroll through or search for specific logs. For a more in-depth look visit AWSLogs on GitHub. Quick install command:
pip install awslogsExample command (substitute the date time with your own):
awslogs get sg-2019-04-01-13-00-14_selenium-build_sg-2019-04-01-13-00-14 selenium/selenium-pytest --start='5d' --no-group --timestampComing Soon
This is already a big post. We can’t cover every aspect of this project at once. But this means you can anticipate other articles which will cover the following topics:
- Automating it all with GitLab CI
- Local setup via docker-compose when you don’t want to push your code to the master 😉
- Uploading our results to S3
- Triggering a AWS Lambda function to send us a message via slack when the results are uploaded to S3
- Getting the cluster to communicate with an SSO
Verfasst von:

Mohamad
Mohamad ist Frontend Engineer bei cosee und JavaScript-Spezialist.